Mostly-CSS Drop-down Combo Boxes
Line-by-line: advanced CSS tricks for click-to-open drop-down lists and menus 14 Aug 2018For as long as I can remember, there were always two kinds of selectors:
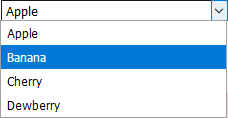
There was the kind where the text on top could be edited, and the kind where it couldn’t. HTML includes the second kind, no problem:
  <select>
    <option>Apple</option>
    <option>Banana</option>
    <option>Cherry</option>
    <option>Dewberry</option>
  </select>
But I was shocked to learn that the first kind doesn’t exist in HTML. Oh, there’s a thing called a datalist, but it doesn’t work right: users can’t click something to view the entire list, and as you begin typing, items immediately start disappearing if they don’t start with the same string that the user typed.
But CSS is a styling tool of impressive power: entire video games have been built out of CSS, HTML and a few picture files. (Great, I just lost half my audience.)
This doesn’t mean CSS can do anything, but it does mean there are at least “hacks” to accomplish a wide variety of tricks. Those of you who are done playing games are probably interested to learn about some of the tricks of the trade, and I think there’s a lot to learn by figuring out how to do a combo box.
In this article you’ll learn how this thing works:
How to use it
The combobox can be constructed out of divs and/or spans; just remember that an HTML parser has a few nesting rules, e.g. it does not allow p to be an ancestor of div or ul, and span cannot be an ancestor of p or div (These rules do not apply to JavaScript/React code that edits the DOM.)
The CSS will expect three children: first the top part (content to always show), then <span class="downarrow"></span> for the down arrow, and finally the content to show inside the dropdown box:
  <span class="combobox">
    <span>Simple combo box</span>
    <span tabindex="-1" class="downarrow"></span>
    <span>Drop-down contents go here</span>
  </span>
By default the dropdown will only open when the down arrow (▾) is clicked. To make the box open when the top content is clicked, you need to add the dropdown class to the combobox, and add a tabindex="0" attribute to the first child:
  <span class="combobox dropdown">
    <span tabindex="0">Simple combo box</span>
    <span tabindex="-1" class="downarrow"></span>
    <span>Drop-down contents go here</span>
  </span>
Note: tabindex="-1" means “you can click to give it the focus, but you can’t focus it using Tab on the keyboard”. tabindex="0" means “you can focus it with a click or with the tab key, and the browser will choose the order in which different elements are focused by the Tab key.”
Note: Unlike a <select> element, the popup box won’t be able to go outside the browser window (this may be an intentional limitation of all user-defined content; if user-defined content could extend beyond the edge of the page area, there might be a security risk of web sites trying to confuse or trick users.)
As a bonus, you’ll be able to make a dropdown list that is not a combo-box with the dropdown class alone:
  <div class="dropdown">
    *** <span tabindex="0">Dropdown menu</span> ***
    <span>
      Contents of drop-down popup go here
    </span>
  </div>
This is intended as a click-to-open dropdown menu (if you want a dropdown menu that opens on mouse hover instead of mouse click, there are already many other tutorials about that.)
In this case the last element contains the drop-down content and all other elements are shown above it, but only elements with a tabindex attribute can be clicked to open the popup area.
You can safely edit the margin and border of a combo box and its children without messing up its behavior, except one thing: don’t let padding-right get too small because the ▾ down arrow is shown in the padding; its size should be at least 1em.
Summary
- The
comboboxclass is for a combo box - The
dropdownclass is for menus and combo boxes that drop down when the top content is clicked (remembertabindex="0") - The
downarrowclass adds the down-arrow icon (tabindex="-1"is required, because it cannot be added via CSS.) - The last child of
comboboxordropdownis the dropdown content. - Click here to view the demo with source code.
CSS Features We Will Need
Selectors
- Basic selectors:
.ameaning “match elements withclass='a'”,A, Bmeaning “match selector A or selector B”,A Bmeaning “match a B element that has an A element as an ancestor”, andA > Bmeaning “match a B element whose parent is an A element” :first-childpseudo-selector:*:first-childmeans “match any alement as long as it is the first child of some parent element”:last-childpseudo-selector:*:last-childmeans “match any alement as long as it is the last child of another element”. For example,.combobox > *:last-childfinds the last child of any element withclass="combobox".:emptypseudo-selector:.downarrow:emptymeans “match an element withclass="downarrow"if it doesn’t have anything in it (not even plain text)”.:only-childpseudo-selector:*:only-childmeans “match any element if it is the only child of some other element”:notpseudo-selector:.dropdown:not(.sticky)means “match an element with thedropdownclass if it does not have thestickyclass.”:focuspseudo-selector:.downarrow:focusmeans “match an element with thedownarrowclass if it has the focus because it has atabindexand it was clicked with the mouse or selected with Tab.:hoverpseudo-selector:.foo:hovermeans “match an element with thefooclass when the mouse pointer is on top of it.A ~ Bmeans “match B if an earlier sibling matched A”.
Styles
- Basic styles: make sure you understand the box model and its various associated styles (including
width,height,min-width,max-heightetc.) before you continue. Also, you should know about other basic styles likefont-size,font-family,color, andbackground-color, and about units, expecially the most common units:px,em,rem, and%. box-sizing: border-boxmeans that the width and height of an element includes the padding and border (learn more)display: we’ll be usingdisplay: block, which displays an element as a “block”, which is like a paragraph in that two adjacent blocks have line breaks between them. We will also usedisplay: inline-block, which displays an element inline, e.g. like an icon image within a paragraph, but still allowing margins, borders and padding. We will not explicitly usedisplay: inline, which is used for elements that do not have margins, borders or padding and do not need line breaks between them (<b>like this</b>). (Learn more)position: in the combo box, we will see how this style is used to take elements out of the normal document flow. Elements normally have a style ofposition: static, which just means “position it on the page normally”.position: relativeis likestatic, except two things: first, the element can be shifted left, right, up or down without affecting any other elements. However, the combo box doesn’t need this feature. The second effect ofrelativeis to mark the element as “positioned”. This matters because another position,absolute, positions an element relative to its nearest “positioned” ancestor. Specifically, the dropdown popup will useposition: absolutein order to position itself relative to the top part of the combo box; therefore the combo box itself is markedrelative. Also, anabsoluteelement doesn’t affect the positioning of other items on the page, not even its own parent element, and that’s just what we want for a popup box. (Learn more aboutposition.)left,top,rightandbottom: These styles are used withposition: relativeandposition: absolute, and they work a little differently for each one. More on that later.outline: Outline is an extra border drawn outside an element’s normal border. It is normally used to highlight an element, e.g. to indicate it has been “selected” by a user. Because outlines are expected to be temporary, they don’t occupy space on the page (i.e. adding an outline won’t push other elements out of the way.)box-shadow: Draws a shadow “under” the element (well, actually the shadow is drawn outside the element, which looks very strange if the element has no background). This will be handy for the dropdown popup!z-index: This style changes the order in which an element is drawn by the browser. A higher z-index causes an element to be drawn later so that it appears to be above other things on the page. We’ll need a large z-index for our dropdown popup so that it appears on top of everything else. The children of the popup will get a new “stacking context”, which basically means they will automatically be drawn on top of the popup, which is good. Caution:z-indexonly works on “positioned” elements. (Learn more)cursor: Controls the mouse cursor’s appearance.text-align: Horizontal text justification (left,rightorcenter).pointer-events: This style’snonesetting makes an element “invisible” to mouse clicks.transform: Allows you to rotate, scale, skew, or translate a block (or inline-block) element. These transforms are smart and affect mouse input also; for example, you could rotate text 30 degrees and still select it with the mouse.transition: enables animation when styles change.opacityis a number between 0 and 1 controlling how easy an element is to see: 1 is the normal value which makes an element fully visible, and 0 makes an element completely invisible (unlikevisibility: hiddenanddisplay: none, the other ways of making something invisible,opacity: 0does not prevent the mouse from interacting with the element.) In this article we will use opacity for animation; by animating the transition betweenopacity: 0andopacity: 1, we can make an element fade in or out.
Pseudo-element
::beforeor::after: Refers to a virtual element within an element previously selected, before or after its normal content. For example if you writep::before { content: "!" }then!will appear at the beginning of every paragraph. We can usecontentwith::beforeor::afterto draw the down arrow (▾).
Preparing the initial appearance
.combobox and .dropdown need to be relative so that the dropdown popup can be positioned relative to them. display: inline-block allows the combo box to have margins, padding and border, but unlike display: block it allows other things to appear on the same line (e.g. labels or other combo boxes.)
.combobox, .dropdown {
  /* "relative" and "inline-block" (or just "block") are needed
     here so that "absolute" works correctly in children */
  position: relative;
  display: inline-block;
}
Combo boxes, but not dropdown lists, will have a built-in border:
.combobox {
  border: 1px solid #999;
  padding-right: 1.25em; /* leave room for ▾ */
}
The color #999 is slightly darker than the border on Chrome’s <select> element, and slightly lighter than FireFox’s <select> element, so it doesn’t look too much different than either of them.
How do we draw the little down arrow (▾)? The difficulty here is controlling its height. The combo box might have content of an unpredictable size: small font, large font, one line or two lines. The arrow “button” needs to have the same height so that it works no matter where the user clicks on it - anywhere within the border should work. So, how can we make the arrow adapt to the height of its left sibling? CSS grid can accomplish this straightforwardly, but it is not supported by all browsers. Perhaps flexbox could do the job too, but I decided to use an old trick for compatibility with older browsers: absolute positioning. With absolute positioning, I can force the arrow to have the same height as its container. The disadvantage of this approach is that the arrow will exist outside the normal flow of the document, so the browser won’t reserve any space for it. Instead, we will give the combo box some padding on the right side (1.25em above), and the arrow will live within the padding.
In absolute positioning mode, top aligns the top edge of an element relative to the top edge of its container: top: 0 means the two top edges will be at the same location. Similarly left: 0 aligns the left side of the element to the left side of the container, and so on. Positive coordinates push the element “inward” relative to the container, so top: 10px means “put the element 10px down from the top of the parent”, while bottom: 10px means “put the element 10px up from the bottom of the parent.” In this case we need top: 0; bottom: 0; right: 0; width: 1.25em to put the arrow on the right side, top-to-bottom.
.combobox > .downarrow, .dropdown > .downarrow {
  display: block;     /* Allow margin/border/padding/size */
  position: absolute; /* Outside normal flow, relative to container */
  top: 0;    /* Align top edge of downarrow with top edge of combobox */
  bottom: 0; /* Align bottom of downarrow with bottom of combobox */
  right: 0;  /* Align right edge of downarrow with right edge of combobox */
  width: 1.25em;

  cursor: default; /* Use arrow cursor instead of I-beam */
  nav-index: -1; /* sets tabindex - nonfunctional in most browsers */

  border-width: 0;        /* disable by default */
  border-color: inherit;  /* copy parent border */
  border-left: inherit;   /* copy parent border */
}
Here, display: block and display: inline-block have the same effect so I used the shorter one. I also disabled the I-beam mouse cursor normally shown over text (since the down arrow counts as text). There is actually a way to set tabindex in css, it’s called nav-index, but most browsers don’t support it, so if you find that your combo box only works in Opera, you know why. You must therefore add tabindex="-1" beside class="downarrow".
This code disables the borders, with the caveat that the border color/style should be inherited from the parent element (the combo box) if other css increases border-left-width. You can use the inherit option on any attribute that doesn’t inherit from parent by default, by the way. I decided there should be a left border if the popup won’t open when the left side is clicked. That way the dropdown arrow looks like a button, subtly suggesting it can be clicked. Remember the plan: only dropdown, not combobox alone, will open when the left side is focused. Therefore I will add a border when combobox alone is used:
.combobox:not(.dropdown) > .downarrow {
  border-left-width: 1px;
}
Next, if the user has provided us with an empty <span class="downarrow"></span>, we need to magically add the missing down arrow character using ::before (or ::after) and content:
.downarrow:empty::before {
  content: '▾';
}
The down arrow needs to be centered within the .downarrow element, too. text-align: center will center the text horizontally, but vertical centering is tricky. vertical-align: middle doesn’t work, because it is designed to align inline elements with the surrounding text; what we want is to align our down arrow pseudo-element with the parent .downarrow container. There’s a trick to it:
.downarrow::before, .downarrow > *:only-child {
  text-align: center; /* Center horizontally */
  /* vertical centering trick */
  position: relative; /* Allow the element to be shifted */
  top: 50%;           /* Move down by 50% of container size */
  transform: translateY(-50%); /* Move up by 50% of element size */
  display: block;     /* `transform` requires block/inline-block */
}
Remember that we add the ::before content only if the .downarrow is empty. If the user has provided zeir own custom down arrow element, we still want to center it, hence the .downarrow > *:only-child selector.
And if the combo box contains an <input> element, it shouldn’t have a border:
.combobox > input {
  border: 0 /* combo box already has a border */
}
This next part is optional, but usually the first child of a combo box should have a width of 100% of its parent .combobox so that if the combo box is wider than its first child, the first child stretches to match. And in case the user constructed the combobox out of spans rather than divs (e.g. so it could be placed within a <p>), it may make sense to set the first child as inline-block so it can have padding and margins.
.combobox > *:first-child {
  width: 100%;
  box-sizing: border-box; /* so 100% includes border & padding */
  display: inline-block;
}
Preparing the dropdown list
Initially we just want it hidden, so we can use display: none.
But in preparation for when it is visible, let’s set some other properties too, starting with position: absolute so it’s outside the normal document flow (remember that an absolute element is positioned relative to its nearest relative ancestor, which is .combobox or .dropdown). When displayed, it should have a border and a background, of course, and also a shadow underneath it. Here you see box-shadow: 1px 2px 4px 1px #4448, which means “show a shadow 1px to the right of the element, 2px downward, blurred by 4px, and make the shadow 1px larger than the element itself, with a color of #4448”. We also need a nice big z-index so the popup will appear on top of everything else:
.dropdown > *:last-child,
.combobox > *:last-child {
  display: none;          /* hidden by default */
  position: absolute;     /* outside document flow */
  left: 0;                /* Left side of popup = left side of parent */
  top: 100%;              /* Top of popup = 100% below top of parent */
  border: 1px solid #999; /* gray border */
  background-color: #fff; /* white background */
  box-shadow: 1px 2px 4px 1px #4448; /* shadow behind */
  z-index: 9999;          /* draw on top of everything else */
  min-width: 100%;        /* at least 100% as wide as its container */
  box-sizing: border-box; /* width includes border & padding */
}
Here I’ve used left: 0 and top: 100% to position the popup correctly, but in this case it turns out that the default position of the popup is practically the same, so these styles aren’t really necessary.
To make the drop-down box visible, all we really need is display: block. But which selectors do we need to make that happen?
??? {
  display: block;
}
Most obviously the dropdown should be shown in these three cases.
- The user clicked the
.downarrow - The user clicked or tabbed to
.dropdown - The user clicked or tabbed to a child of
.dropdown
The drop-down box is the last child, so we’ll need to combine the *:last-child selector with :focus to detect when one of the above things has been clicked or tabbed-to:
.combobox > .downarrow:focus ~ *:last-child,
.dropdown:focus              > *:last-child,
.dropdown > *:focus          ~ *:last-child {
  display: block;
}
Tip: It’s important that the popup appears last within the combobox. You can write a selector A ~ B that will select B if it comes after A, but CSS does not have any selector that can select B if it comes before A. So in CSS, there would be no way to open a popup box in response to the user clicking a .downarrow element that appears after the popup box.
We’re not done yet, though: what if the user clicks a textbox or a link inside the drop-down box? The click will cause the .downarrow or the .dropdown to lose the focus, causing the dropdown box to disappear instantly. In the case of a link, the browser focuses the link when the mouse button goes down but it does not follow the link until the mouse button is released. So if the dropdown disappears instantly, any links in the dropdown cannot be followed!
To fix this, we should keep the box open whenever something within the :last-child has the focus:
.combobox > .downarrow:focus ~ *:last-child,
.dropdown:focus > *:last-child,
.dropdown > *:focus ~ *:last-child,
.combobox > *:last-child:focus-within,
.dropdown > *:last-child:focus-within {
  display: block;
}
Caution: This doesn’t work in Edge/IE (a workaround is described below).
If the down-arrow is clicked a second time, we should hide the dropdown box. This can be accomplished like so:
.downarrow:focus {
  pointer-events: none; /* Causes second click to close */
}
This causes the .downarrow to be invisible to mouse events when it has the focus, so that when you click it, you are actually clicking what is behind it (the .combobox). This causes it to lose the focus, which in turn causes the dropdown box to disappear.
We can do the same thing for .dropdown, so clicking the top area of a .dropdown again makes it disappear:
.dropdown > *:not(:last-child):focus,
.downarrow:focus,
.dropdown:focus {
  pointer-events: none; /* Causes second click to close */
}
This mostly works, but if your top area contains a textbox, there is a side effect since the textbox won’t process mouse input normally. However I have found that the textbox is still usable. In FireFox you can click and drag to select text if you start when the popup is closed, but it doesn’t work when the popup is open. In Edge it’s the opposite, you can click and drag to select text only when the popup is open. Either way it’s basically usable since the user is likely to retry once if his input doesn’t work the first time. Chrome’s behavior is… inconsistent. In any case, to get perfect behavior - where a click closes the box without causing the textbox to lose focus - I think JavaScript is required.
Finishing touches
The combo box should normally have a margin, but this seems optional, since <input> controls don’t have one by default:
.combobox {
  margin: 5px;
}
Let’s make this thing cooler by opening the box with animation.
The transition property is the easiest way to do animations. In fact, for our purposes a simple command like transition: 0.4s; enables animations for all supported styles. But so far the only style we are changing is display, and changes to display cannot be animated. So let’s try animating a transition from opacity: 0 to opacity: 1 by modifying our existing styles…
.dropdown > *:last-child,
.combobox > *:last-child {
  display: none;
  /*
     ... other styles same as before ...
  */
  opacity: 0;
  transition: 0.4s;
}

.combobox > .downarrow:focus ~ *:last-child,
.dropdown:focus > *:last-child,
.dropdown > *:focus ~ *:last-child,
.combobox > *:last-child:focus-within,
.dropdown > *:last-child:focus-within {
  display: block;
  opacity: 1;
  transition: 0.15s;
}
The time on the transition controls how long it takes to enter the current state, so this code should mean “take 0.15 seconds to show and 0.4 seconds to hide.”
But the animation doesn’t work. It turns out that display: hidden blocks animations. Instead we need to use one of the other ways of hiding things. Another way to hide things is with visibility: hidden. Unfortunately, this partially blocks animations, too: the animation for showing the popup works, but the animation for hiding the popup doesn’t. We can’t rely on opacity: 0 by itself to hide an element, because the mouse can still interact with an element that has opacity: 0. However, we can fix this with pointer-events: none. So the working fade-in and fade-out looks like this:
.dropdown > *:last-child,
.combobox > *:last-child {
  display: block;
  /*
     ... other styles same as before ...
  */
  transition: 0.4s;
  opacity: 0;
  pointer-events: none;
}

.combobox > .downarrow:focus ~ *:last-child,
.dropdown:focus > *:last-child,
.dropdown > *:focus ~ *:last-child,
.combobox > *:last-child:focus-within,
.dropdown > *:last-child:focus-within {
  display: block;
  transition: 0.15s;
  opacity: 1;
  pointer-events: auto;
}
Another flourish we could add is to move the popup into position, e.g. by animating top:
.dropdown > *:last-child,
.combobox > *:last-child {
  display: block;
  /*
     ... other styles same as before ...
  */
  top: 0;
  opacity: 0;
  transition: 0.4s;
  pointer-events: none;
}

.combobox > .downarrow:focus ~ *:last-child,
.dropdown:focus > *:last-child,
.dropdown > *:focus ~ *:last-child,
.combobox > *:last-child:focus-within,
.dropdown > *:last-child:focus-within {
  display: block;
  top: 100%;
  opacity: 1;
  transition: 0.15s;
  pointer-events: auto;
}
I decided this was a bit “over the top” and did not include it in the final version.
Finally, we should have a focus rectangle - a border showing when the combo box is “active”. First let’s add a focus rectangle for that down arrow:
.downarrow:focus {
  outline: 2px solid #48F8;
}
Ideally we would have a focus rectangle for the combo box itself, like this:
.combobox:focus-within {
  outline: 2px solid #48F;
}
This works fine in Chrome, but in Firefox 61 the outline is expanded beyond the border to enclose the entire popup box also, which looks a little odd, especially if the popup box doesn’t have the same width as the top part. In Edge the outline doesn’t show up at all because Edge doesn’t support :focus-within (see below). So, what can we do instead? I decided to use this:
.combobox > *:not(:last-child):focus {
  outline: 2px solid #48F8;
}
This draws an outline around the focused child instead of the combo box itself, but this sometimes looks odd too, if the child is not the same size as the enclosing combo box. So I added transparency (#48F8 instead of #48F) to make it less visible, and therefore less odd-looking in the worst case.
Stickiness
The styles we have so far keep the box open only when something is focused, so if you click on plain text in the popup area, the popup closes. For the final version I expanded the list of reasons to keep the popup open to include a sticky style that will keep the dropdown open on mouse hover, so that clicking doesn’t close the box:
.combobox > .downarrow:focus ~ *:last-child,
.dropdown:focus > *:last-child,
.dropdown > *:focus ~ *:last-child,
.combobox > *:last-child:focus-within,
.dropdown > *:last-child:focus-within,
.combobox > .sticky:last-child:hover,
.dropdown > .sticky:last-child:hover {
  display: block;
  top: 100%;
  opacity: 1;
  transition: 0.15s;
  pointer-events: auto;
}
As I discussed earlier, glitches occur when the top area of a combobox contains a textbox. To let you easily avoid this problem, I tweaked the existing css so that the pointer-events: none style is not applied if the .dropdown element also has the sticky class:
.dropdown:not(.sticky) > *:not(:last-child):focus,
.downarrow:focus,
.dropdown:focus {
  pointer-events: none; /* Causes second click to close */
}
Finally, if a .dropdown list contains links, there is a small inconvenience: after clicking a link, the list will not close automatically since the link has the focus and we programmed the dropdown not to close when a child has the focus. To avoid this I added support for a new less-sticky class. Like sticky, less-sticky keeps the popup open when the mouse hovers over it. Unlike sticky, less-sticky does not keep the popup open when a child has the focus. So our new list of selectors is getting pretty long:
.combobox > .downarrow:focus ~ *:last-child,
.dropdown:focus > *:last-child,
.dropdown > *:focus ~ *:last-child,
.combobox > .sticky:last-child:hover,
.dropdown > .sticky:last-child:hover,
.combobox > .less-sticky:last-child:hover,
.dropdown > .less-sticky:last-child:hover,
.combobox > *:last-child:focus-within:not(.less-sticky),
.dropdown > *:last-child:focus-within:not(.less-sticky) {
  display: block;
  opacity: 1;
  transition: 0.15s;
  pointer-events: auto;
  top: 100%;
}
And we’re not even done yet, because this is not compatible with Edge and Internet Explorer yet.
Edge Cases
Once I got my combo box working perfectly in Firefox and Chrome, I was dismayed to see it completely ugly and unusable in Edge. What went wrong?
First, the borders were gone because Edge and IE don’t support opacity on borders, as in rgb(200,150,100,50) or #8888. I had used #8888 as the border; to make it work on Edge, I changed it to #999. Another alternative is to offer a non-opaque border just for Edge:
  border: 1px solid #888; /* Edge/IE can't do border opacity */
  border: 1px solid #8888; /* All other browsers */
Second — click as I might — the down-dropping-divs just didn’t drop down!
In solving this issue I learned something new: if a browser doesn’t understand a selector used in a CSS declaration, it will ignore the entire block. For instance if you write .x, .y, .z:unknown { margin:1em }, then x and y won’t get margins simply because the browser doesn’t understand unknown.
It turned out that Edge doesn’t understand :focus-within, which is what allows the drop-down area to stay open when an input element deep within the drop-down area gets clicked. The problem was, I’d mixed supported and unsupported selectors together. In order to make Edge work at all, I needed to repeat the whole block of “how-to-open-the-dropdown-list” styles separately for the selectors that use :focus-within, so that those selectors don’t stop the other selectors from working. Then, as a workaround for the lack of :focus-within, I decided to attempt to detect Edge and automatically keep any .dropdown list open when the mouse is :hovering in that case. That way, it is still possible to use a focused element (such as an a href or an input) inside the dropdown area, although it will disappear early if the mouse moves off it. The code for all this is as follows:
/* List of situations in which to show the dropdown list. */
.combobox > .downarrow:focus ~ *:last-child,
.dropdown:focus > *:last-child,
.dropdown > *:focus ~ *:last-child,
.combobox > .sticky:last-child:hover,
.dropdown > .sticky:last-child:hover,
.combobox > .less-sticky:last-child:hover,
.dropdown > .less-sticky:last-child:hover,
.combobox > *:last-child:focus:not(.less-sticky),
.dropdown > *:last-child:focus:not(.less-sticky) {
  display: block;
  opacity: 1;
  transition: 0.15s;
  pointer-events: auto;
}
/* focus-within not supported by Edge/IE. Unsupported selectors cause
   the entire block to be ignored, so we must repeat all styles for
   focus-within separately. */
.combobox > *:last-child:focus-within:not(.less-sticky),
.dropdown > *:last-child:focus-within:not(.less-sticky) {
  display: block;
  opacity: 1;
  transition: 0.15s;
  pointer-events: auto;
}
/* detect Edge/IE and behave if though less-sticky is on for all
   dropdowns (otherwise links won't be clickable) */
@supports (-ms-ime-align:auto) {
  .dropdown > *:last-child:hover {
    display: block;
    opacity: 1;
    pointer-events: auto;
  }
}
/* detect IE and do the same thing. */
@media all and (-ms-high-contrast: none), (-ms-high-contrast: active) {
  .dropdown > *:last-child:hover {
    display: block;
    opacity: 1;
    pointer-events: auto;
  }
}
Third, the outline style wasn’t working in Edge. Once again the problem was that Edge doesn’t support non-opaque outlines, and the solution is a special opaque style for Edge:
  outline: 2px solid #8AF; /* Edge/IE can't do outline transparency */
  outline: 2px solid #48F8;
Fourth, I had placed two combo boxes within a <label> element and attempting to open the second one always opens the first one instead. It turns out that in Edge, if you are using a mouse, you can only select the first input element within a label.
Fifth, the dropdown boxes didn’t have shadows. Once again this was because I used a non-opaque shadow, and once again Edge needed its own special CSS:
  box-shadow: 1px 2px 4px 1px #666; /* Edge can't do shadow transparency */
  box-shadow: 1px 2px 4px 1px #4448;
Internet Explorer 11 has almost exactly the same limitations, so fixing Edge mostly fixed IE, except that a different browser detection technique was needed for IE than Edge.
Synchronizing the popup with the top area
Unfortunately, CSS can’t do this for us, so in the final demo, JavaScript is used to update the top part of the combo box when the popup part changes. For instance, I used this jQuery-based code to update the top part of the color picker:
function parentComboBox(el) {
  for (el = el.parentNode; el && Array.prototype.indexOf.call(el.classList, "combobox") <= -1;)
    el = el.parentNode;
  return el;
}
$(".combobox .color").mousedown(function() {
  var c = this.style.backgroundColor;
  $(parentComboBox(this)).find(".color")[0].style.backgroundColor = c;
});
Final version
Click here to view the demo with source code on CodePen.
Liked this article? Don’t forget to share it!